
Esta foi a peça onde comecei definitivamente a juntar as técnicas de joalharia ao design com os elementos e temas com que mais me identifico. Todas as peças são criadas a partir de escolhas pessoais – se gostamos mais de formas com bicos ou só curvas, grande ou pequeno, etc – mas aqui começou a solidificar-se aquilo que considero o meu estilo de jóias: uma mistura entre chapa e fio, com a pedra lindíssima como elemento central, oxidação da prata e muito detalhe e textura. O tema da chave ornamentada vem da inspiração steampunk, que me atrai há muito.

Como o exercício principal desta peça era criar uma cravação em coroa, comecei por escolher a pedra. Usei um topázio amarelo triangular que comprei na FIA há uns dois anos. A pedra foi cara mas gostei tanto do formato, cor e lapidação que não resisti a comprar. Uma pedra destas merecia uma peça especial, por isso desenhei diversas chaves até chegar a um projecto que me agradava. A “cabeça” da chave é também triangular, seguindo a forma da pedra.
Comecei pela cravação da pedra, que iria determinar as dimensões do resto da peça. Apesar de ter feito o projecto à escala real, é sempre bom ter o elemento central primeiro para ter a certeza que não fica demasiado apertado no final. Sem a cravação é mais fácil fazer pequenos erros de escala se não tivermos experiência ou cuidado suficientes.
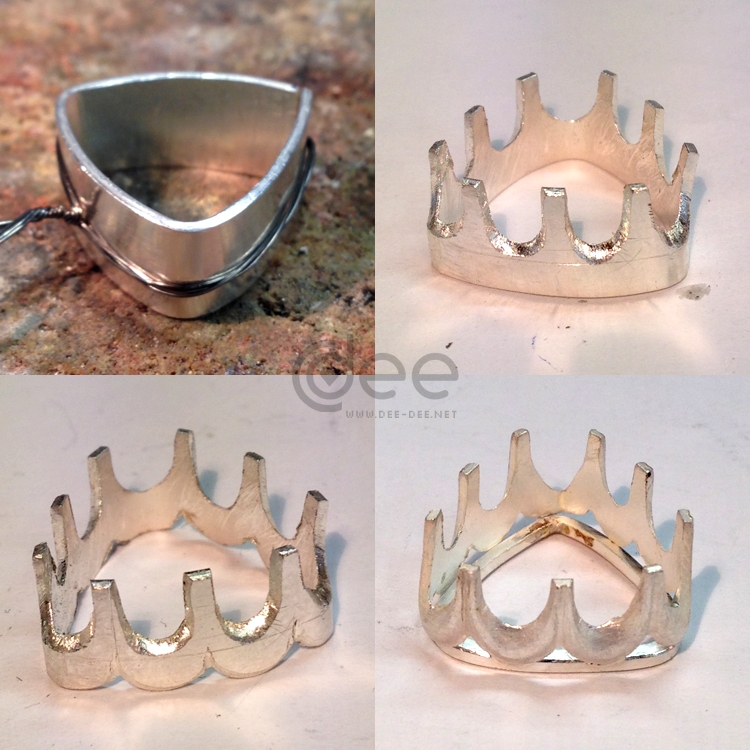
Para a coroa usei chapa de 0,5 mm com a altura do pavilhão (parte de baixo da pedra, afunilada). Formei um triângulo com cantos arredondados, seguindo a forma e tamanho da pedra. Numa cravação de garras, esta base tem de ficar um pouco mais pequena do que a pedra porque as garras são soldadas por fora. No caso da cravação em coroa, o tamanho é um pouco maior. A pedra não pode caber completamente dentro da cravação mas quase.
Fazem-se cortes espaçados à volta da chapa, primeiro com a serra e depois com a lima triangular. Esses cortes são depois alargados e arredondados com uma fresa ou lima de meia cana, formando assim as garras e a forma de coroa. No enfiamento vertical das garras são também cortadas pequenas fendas em baixo que são igualmente arredondadas para dar a ideia de pequenos Us entre cada duas garras. Vai-se limando a chapa até a forma estar aperfeiçoada. Por fim limam-se linhas verticais no centro de cada garra para parecer que estas são mais finas e o resultado ser mais delicado.
Devo dizer que, pelo menos na primeira vez, este foi um processo demorado, de grande cuidado e paciência. Nos cantos, em particular o que tem a soldadura, é preciso muito cuidado para não limar demasiado porque o ângulo é maior e a lima tem tendência a gastar mais metal de uma só vez.
Assim que a forma está regular e redondinha, faz-se uma forma igual em fio quadrado de 1 mm que é soldado por baixo da chapa, servindo de base à coroa. É a este fio quadrado que vamos depois soldar os restantes elementos.

Com a cravação feita foi a vez de começar a construir a chave. A estrutura geral foi feita em fio quadrado de 2 mm. Por dentro da linha curva do topo soldei um fio torcido. O torcido é feito a partir de dois fios de 0,8mm (ou um fio dobrado ao meio). Uma ponta é presa no torno e a outra no porta-cavilhas. Vamos rodando o porta-cavilhas, torcendo os fios e dando calor com o maçarico nas zonas que vemos que não estão a enrolar tão bem como o resto.

O pé da chave foi feito com o mesmo fio quadrado de 2 mm e fio torcido. A junção do pé com a cabeça foi coberta com uma caixa composta por duas chapas de 0,5 mm em U curvas (uma em cima e outra em baixo) e duas paredes laterais, ou batas, com 0,8 mm de espessura. Primeiro soldam-se as laterais à chapa de base e só depois se coloca esta estrutura no sítio para soldar a “tampa”. Para conseguir que as laterais, ou batas, fiquem verticais sobre a base, faz-se uma só bata em U e depois de soldar ambos os lados desse U corta-se o excesso.
Esta parte foi a mais complicada porque a solda inicial, que fica por dentro, não se consegue isolar e volta a correr quando se aquece novamente, o que na primeira tentativa entortou a chave e foi preciso repetir o processo com maior apoio nessa zona. O ideal será soldar com a peça assente em gesso para ter a certeza que não mexe.
Por cima dessa caixa coloquei mais um fio redondo e outro rectangular, com fim decorativo.
Na zona de baixo da chave, em vez de dentes criei uma peça decorativa com caracóis e S em fio redondo de 1 mm. Soldei também três pequenas secções de fio rectangular com 1,5 mm de lado e 0,45 mm de espessura sobre o pé, para dar mais detalhe a essa zona.

Com a estrutura montada foi a vez de fazer os caracóis em S que iriam ligar a cravação à estrutura. Foi um bocado como fazer filigrana só que com um fio mais grosso. Usei o mesmo fio de 1 mm para ter a certeza que a peça tinha estabilidade. Fiz também pequenas bolinhas de prata para preencher os cantos e dar um pouco mais de variedade (tudo isso já previsto no projecto inicial).

Tendo o cuidado de isolar muito bem todos os caracolinhos com corrector, para não derreterem, soldei a cravação e por fim criei um L duplo em fio de 1 mm para servir de bilheira (peça de suporte por onde passa a corrente).
Para terminar a cravação é preciso fazer pequenos cortes no interior das garras para sustentar a pedra. Estes cortes têm de estar todos à mesma altura e não podem ser demasiado fundos para evitar que as garras se partam ao dobrar sobre a pedra. É um processo que requer paciência e rigor.

A peça foi oxidada e depois polida. O óxido fica nas reentrâncias, dando mais profundidade e realce ao relevo. O ultimo passo é a cravação da pedra e polimento da cabeça das garras, assim como eliminar algum risco accidental que tenha ocorrido durante a cravação.
Para cravar a pedra empurram-se as garras com cuidado, uma a uma, até assentarem na pedra. Se alguma ficar muito no ar pode-se passar a serra entre o metal e a pedra para gastar mais um bocadinho. Isto só se deve fazer se a pedra tiver dureza suficiente. Se fosse uma turquesa, por exemplo, não se poderia fazer isso porque a serra riscaria a pedra. Para verificar se a serra é segura com determinada pedra, consulte a minha tabela de durezas na escala de Mohs. As lâminas da serra são geralmente feitas de aço temperado, pelo que andam à volta de um 7 na escala de Mohs. Isso quer dizer que já é arriscado usar a serra com uma ágata e completamente desaconselhado para pedras mais moles.
Fiquei muito satisfeita com esta peça e inspirada para fazer variações sobre o tema.
Key Pendant – crown setting
This was the piece where I finally began joining silversmith techniques with the elements and themes I most identify with. All jewellery pieces are designed from a personal perspective – whether we prefer pointy or round shapes, large or small, etc – but here I began to solidify what i feel is my style of jewellery: a combination between sheet metal and wire, with a gorgeous stone as the focal point, oxidized silver and lots of details and texture. The idea of the key comes from my appreciation of steampunk imagery.
As the main goal of the piece was to create a crown setting, I started by sellecting the gemstone. I used a lovely yellow topaz I had bought at an International crafts fair a couple of ears earlier. The gemstone was expensive but I liked the shape, color and cut so much I couldn’t resist buying it. Such a gemstone deserved a special setting, so I drew several keys before getting to a project I liked. I was particularly inspired by the amazing work of artists like Iza Malczyk. The head of the key follows the triangular shape of the stone.
The crown setting would determine the size of the other elements, so I started there to make sure the fit wouldn’t be too tight in the end. Even when the project is at a scale of 1:1 it’s good to have a physical element to help get the rest of the measurements right, especially because a drawing won’t give you the exact notion of metal thickness, for example. It’s tempting to start from the outside in but you risk making sizing mistakes if you’re not experienced or careful enough, so I took the safest route.
For the setting I used silver sheet with a thickness of 0,5 mm (24 AWG) and the height of the stone pavilion (the lower, tapered part of the stone). I formed a triangle with rounded corners, following the shape and size of the stone. When doing a prong setting you have to make sure the bezel is a little smaller than the stone because the prongs are soldered on the outside and should run straight up the side of the stone. In a crown setting like this one, you have to make the bezel a little larger. The stone shouldn’t fall down the middle but almost.
I decided how many prongs I wanted and made cuts between each one with a jeweller’s saw. Then I enlarged the cuts with a triangular file. These cuts are further enlarged and shaped with the help of round and half round files until you have a crown shape. At the bottom of the bezel, aligned with the middle of each prong, I made cuts that were also rounded and refined until the bezel looked like it was formed by several U shapes side by side. You just keep filing the metal until you get the shape right. It’s a long and careful process. Finally I filed vertical grooves from top to bottom, at the center if each prong. This is merely a decorative step to make it look like the prongs are thinner and more delicate than they actually are.
All this was a long and careful process that took great care and patience. At the corners I had to be especially careful not to file too much because the tighter angle makes it easier to remove more metal in one go.
As soon as the shape was all nicely regular and rounded I made a similar triangular shape out of 1 mm square wire for the base of the crown setting. It’s this square wire shape that is going to be soldered to the remaining design elements.
With the stone setting completed I was able to turn my attention to the rest of the design and start building the key. The overall structure was made from 2 mm square wire. Inside the top frame I soldered a twisted wire. It was made by twisting two 0,8 mm (20 AWG) wires together (or one wire folded in half). One end of the wires is attached to a pin vice and the other to a bench vice. You turn the pin vice and apply heat with the torch as you go to keep the twisting even and prevent the wires from breaking because they harden as you twist.
The long part of the key was made with the same 2 mm (12 AWG) square wire and twisted wire. I covered the area where this part meets the head of the key with a small box-like component made from silver sheet. I cut two U shape pieces out of 0,5 mm (24 AWG) sheet and curved them. I made the side walls out of another U shape (out of square wire). This helps to keep both walls in place while soldering. If I tried doing one at a time it would be a lot harder to solder them vertically. When the walls are in place, I covered the key skeleton and soldered the “lid” in place.
This part was the hardest because, as you heat up the “box”, the inner solder also heats up and wants to run. On my first try the key got all twisted and I had to try again with better support for all the different parts. I should probably have stabilized it in plaster to prevent such an issue.
The box componente was a bit bare so I decorated it with some bands of round and rectangular wire.
At the bottom of the key, instead of the traditional teeth, I made some wire swirls out of 1 mm round wire. Na zona de baixo da chave, em vez de dentes criei uma peça decorativa com caracóis e S em fio redondo de 1 mm. I also soldered three small sections of 1,5 mm x 0,45 mm rectangular wire around the long stem to add detail to the area.
The main structure was done so it was time to make the swirls that would connect the stone setting to the rest. It was almos like making filigree only with thicker wire. I ised the same 1 mm wire for stability. I also made some small silver balls to fill the negative space in the corners and add more detail.
To prevent the wire swirls from melting as I soldered each one, I covered them with correction fluid (it gets the metal dirty so it doesn’t melt as easily and previous solder doesn’t run). Swirl by swirl I soldered the setting to the base. Finally I created a double lower-case handwritten L shape out of 1 mm round wire to work as a bail.
To set the stone I had to make small cuts on the inside of the prongs, to keep the stone in place. These cuts need to be all at the exact same height and can’t be too deep to prevent the prongs from breaking when they bend over the stone. It’s a process that requires patience and precision.
The key was oxidized with liver of sulfur and then polished. The patina remains in the crevices and adds depth to the textures. The last steps are setting the stone and polishing the prongs to remove any accidental scratches made during the setting process.
The stone is set by carefully pushing each prong until they meet the stone, while making sure it remains level. If any of the prongs refuses to bend completely, you can take the jeweller’s saw and run it between the prong and the stone to remove a bit more metal and make it easier to bend. This should only be done if the stone is harder than the metal of the saw. It’s fine for quartz, topaz and other harder stones but you should be careful with anything softer – it’s risky for agates and mus’t be done at all with a turquoise or pearl. To check if the saw is safe around the stone you’re using, check out my mohs scale chart. Saw blades are usually made from hardened steel, so they fall around 7 on the Mohs hardness scale.
I was very happy with this piece and inspired to make variations on the theme.